

Your basket is empty
Already have an account? Log in to check out faster.
Your basket
Your basket is empty
Already have an account? Log in to check out faster.

Are you intrigued by the photos of sourdough bread all across the internet, or have you fallen completely in loaf with it after taking a bite? If you’d like to get toasty at home with more slices of this deliciously crispy yet chewy and tangy bread, then you wouldn’t want to miss out on learning how to bake your own! Here are some great tips for making your own sourdough starter—the foundation to all loaf-ly sourdough breads.
What is Sourdough Starter?
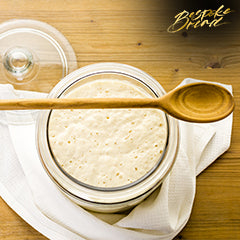
Sourdough starter is a fermented mixture containing natural, wild yeast, and a bacteria called lactobacilli. It is added to doughs to leaven (rise) bread. When a starter is added to the recipe, it creates a distinct sour flavour and light texture, which is exactly what you’ll find in a sourdough bread.
You’ll only knead two ingredients to create a sourdough starter—water and flour. When combined, you create an environment that pulls together various microbes naturally present in the ingredients. The long starch molecules in flour are broken down into simple sugars, providing the perfect environment for microbial reproduction, producing yeast and lactic acid bacteria. Doughn’t want to learn the Science behind sourdough starters? Read on for a simple starter recipe!
Things You’ll Need

Making The Starter
Sourdough starters require a few days to make, but you’ll only have to commit a few minutes of your time each day to creating it. Once you have the final product, you can use it again and again to make a variety of food as long as you continue to feed it.

Day 1: Begin making your starter by mixing 50g of unbleached flour with 50g of water between 24℃ and 28℃ in a jar. Be sure to incorporate all the flour before leaving it semi-uncovered at room temperature for 24 hours.
Day 2: Mix another 50g of flour with 50g of water and stir it into the first mixture you made on day 1. Incorporate all the flour well and leave it at room temperature for another 24 hours, semi-uncovered.
Day 3: Discard all but 50g of day 2’s mixture, add 50g of unbleached bread flour and 50g of water, combine it well and cover lightly. Leave at room temperature for another 24 hours. The mixture should have some bubbles and will likely increase in volume slightly.
Day 4: Discard all but 50g of day 3’s mixture, then mix in another 50g of flour with 50g of water. Make sure that the flour is combined completely. Then, leave it lightly covered at room temperature for another 24 hours. The mixture will continue to show some bubbles and increase in volume.
Day 5: Your mixture should increase in volume significantly with more bubbles on the top and the side of the jar. Discard all but 50g of day 4’s mixture and add 50g of unbleached bread flour and 50g of water, mix well and cover lightly. Leave for 24 hours at room temperature.
Day 6: Discard all but 50g of day 5’s mixture and add 50g of unbleached bread flour and 50g water. Combine well and cover lightly. The mixture should double in volume within a few hours. Observe the rise of the mixture, it should rise to the peak before subsiding. Once it starts to come down, take 50g of mixture out and mix with 50g of unbleached bread flour and 50g of water. Mix well and cover lightly.
Day 7: By the seventh day, the natural yeast should be ready.
Once completed, you can use your starter to make items such as sourdough breads, pizzas, and more. If you wish to increase the amount of starter you’re making, simply multiply the amount of starter, flour, and water you need according to this ratio—1 (starter): 1 (flour): 1 (water)
If you plan to store the starter away for future use, here’s what you knead to do.
Now that you’re well-acquainted with the ingredients and steps that go into making a sourdough starter, you’re bready to begin making your own. But if you’re worried about butchering the entire process and ruining your bakes, consider signing up for a sourdough class in Singapore to learn all about making them! Alternatively, if you’re confident enough, you can get baking with a sourdough starter kit from Bespoke Bread. Check out our sourdough baking workshops or grab a range of baking gear here.
0 comments